Administration

Guide to system administration, parameters, and configuration

Administration Overview

Overview

The Administration section contains system configuration, parameters, and management tools. These features are typically used by system administrators to configure billing rates, manage system settings, and maintain user accounts.

Administration Categories

  • Billing Parameters: Configure billing rates and parameters for AIRNAV, PASC, and Handling Agents
  • Invoice Parameters: Configure invoice settings and preferences
  • Utility Parameters: System-wide utility settings (IT Admin only)
  • Bank Management: Manage bank accounts for payment processing
  • FX Rate Management: Manage foreign exchange rates
  • Billing Period Management: Create and manage billing periods
  • Handling Agents: Manage handling agent records
  • Aircraft Types: Manage aircraft type definitions
  • Airports: Manage airport and vendor airport records
  • Waypoints: Manage navigation waypoints for AIRNAV per-mile billing
  • Users: Manage user accounts (IT Admin only)
  • Roles: Manage user roles and permissions (IT Admin only)
  • Audit Logs: View system audit logs (IT Admin only)
  • IP Whitelist Management: Manage IP address whitelist (IT Admin only)

Permissions

Administration features require specific permissions:

  • Most administration features require full access (Y), not view-only (V)
  • Some features (like Users, Roles, Audit Logs) are IT Admin only
  • Permissions are checked for each administration feature

Billing Parameters

Overview

Billing Parameters allow you to configure billing rates and parameters for different billing types. These parameters control how charges are calculated for invoices.

Billing Parameter Types

  • AIRNAV Parameters: Configure AIRNAV service billing rates
  • PASC Parameters: Configure passenger service charge billing rates
  • Handling Agent Parameters: Configure handling agent billing rates

How to Configure Billing Parameters

  1. Navigate to Administration → Billing Parameters
  2. Select the billing type from the submenu:
    • AIRNAV Parameters: For AIRNAV service billing
    • PASC Parameters: For passenger service charge billing
    • Handling Agent Parameters: For handling agent billing
  3. Configure rates and parameters as needed for the selected type
  4. Save changes

AIRNAV Parameters

AIRNAV Parameters configure billing rates for AIRNAV services. These parameters control how charges are calculated for overflights.

Navigate to Administration → Billing Parameters → AIRNAV Parameters

AIRNAV Billing Parameters

PASC Parameters

PASC Parameters configure billing rates for passenger service charges. These parameters control how charges are calculated for passenger service charges collected at airports.

Navigate to Administration → Billing Parameters → PASC Parameters

PASC Billing Parameters

Handling Agent Parameters

Handling Agent Parameters configure billing rates for ground handling service charges. These parameters control how charges are calculated for ground services provided by handling agents at airports.

Navigate to Administration → Billing Parameters → Handling Agent Parameters

Handling Agent Billing Parameters

Important Notes

  • Billing parameters affect how invoices are calculated
  • Each billing type has its own set of parameters
  • Changes may affect future invoice generation
  • Review parameters carefully before making changes
  • Parameters are specific to each billing type (AIRNAV, PASC, Handling Agent)

Invoice Parameters

Overview

Invoice Parameters allow you to configure invoice settings and preferences, such as invoice numbering, payment terms, and other invoice-related settings.

How to View Invoice Parameters

  1. Navigate to Administration → Invoice Parameters → View Invoice Parameters
  2. Review current invoice parameter settings
  3. Modify settings as needed (if you have full access)
Invoice Parameters

Bank Management

Overview

Bank Management allows you to manage bank accounts used for payment processing. You can add, edit, and configure bank accounts.

How to Manage Banks

  1. Navigate to Administration → Bank Management
  2. View, add, or edit bank accounts
  3. Configure bank account details and currency

Important Notes

  • Banks are used when receiving bank transfer payments
  • Each bank has an associated currency (USD or JMD)
  • Banks must be active to be used in payment processing
Bank Management

FX Rate Management

Overview

FX Rate Management allows you to manage foreign exchange rates used for currency conversion in the billing system.

How to Manage Exchange Rates

  1. Navigate to Administration → FX Rate Management
  2. View current exchange rates
  3. Add or update exchange rates as needed

Important Notes

  • Exchange rates are used to convert between USD and JMD
  • Rates may be set per billing period
  • Accurate rates ensure correct invoice amounts
FX Rate Management

Billing Period Management

Overview

Billing Period Management allows you to create and manage billing periods for different billing types. Billing periods define the time ranges for which invoices are generated.

How to Manage Billing Periods

  1. Navigate to Administration → Billing Period Management
  2. View existing billing periods
  3. Create new billing periods as needed
  4. Set period start and end dates
  5. Configure period status (temporary/permanent)

Important Notes

  • Billing periods must be created before processing data
  • Periods can be temporary (for testing) or permanent (for production)
  • Permanent periods are required for final invoice generation
Billing Period Management

Waypoints Management

Overview

Waypoints Management allows you to manage navigation waypoints used for AIRNAV per-mile billing calculations. Waypoints are specific geographic points used in air navigation to calculate distances and charges for air navigation services. These waypoints are essential for determining billing amounts based on flight routes and distances traveled.

Navigation

Navigate to Administration → Waypoints

Submenu Options

  • View Waypoints: View all waypoint records in the system
  • Add Waypoint: Create a new waypoint record

How to View Waypoints

  1. Navigate to Administration → Waypoints → View Waypoints
  2. The page displays a table of all waypoints
  3. Use the search box to search by designator, type, or coordinates
  4. Click on column headers to sort the table
  5. Use pagination controls to navigate through multiple pages (100 items per page)
  6. Click Edit button to modify a waypoint
  7. Click Add New Waypoint button to create a new waypoint

Waypoints Table

The table displays the following columns:

  • Waypoint ID: Unique identifier for the waypoint
  • Designator: Waypoint designator code (3-10 uppercase letters)
  • Latitude: Latitude coordinates (N/S, degrees, minutes, seconds)
  • Longitude: Longitude coordinates (E/W, degrees, minutes, seconds)
  • Type: Waypoint type (ICAO, VOR, NDB, FIX)
  • Created Date: When the waypoint was created
  • Last Updated: When the waypoint was last modified
  • Actions: Edit button to modify the waypoint

How to Add a Waypoint

  1. Navigate to Administration → Waypoints → Add Waypoint
  2. Alternatively, click Add New Waypoint button from the View Waypoints page
  3. Enter waypoint information:
    • Designator (Required):
      • Enter 3-10 uppercase letters (e.g., ACEDA, JFK)
      • Designator is automatically converted to uppercase
      • Must be unique in the system
    • Type (Required):
      • Select from dropdown: ICAO, VOR, NDB, or FIX
      • ICAO: International Civil Aviation Organization waypoint
      • VOR: VHF Omnidirectional Range navigation aid
      • NDB: Non-Directional Beacon navigation aid
      • FIX: Fixed navigation point
    • Latitude (Required):
      • Direction: Select N (North) or S (South)
      • Degrees: Enter 0-90 (2 digits, auto-padded)
      • Minutes: Enter 0-59 (2 digits, auto-padded)
      • Seconds: Enter 0-59.99 (decimal format, auto-formatted to 2 decimals)
      • Example: N 17 39 09.89
    • Longitude (Required):
      • Direction: Select E (East) or W (West)
      • Degrees: Enter 0-180 (3 digits, auto-padded)
      • Minutes: Enter 0-59 (2 digits, auto-padded)
      • Seconds: Enter 0-59.99 (decimal format, auto-formatted to 2 decimals)
      • Example: W 076 42 44.38
  4. Click Add Waypoint to save

How to Edit a Waypoint

  1. Navigate to Administration → Waypoints → View Waypoints
  2. Find the waypoint you want to edit in the table
  3. Click the Edit button for that waypoint
  4. The Add Waypoint page will load in edit mode with existing data pre-filled
  5. Modify the waypoint information as needed
  6. Click Update Waypoint to save changes

Coordinate Format

Coordinates are entered in degrees, minutes, and seconds format:

  • Latitude Format: N/S DD MM SS.SS
    • Example: N 17 39 09.89 (17 degrees, 39 minutes, 9.89 seconds North)
  • Longitude Format: E/W DDD MM SS.SS
    • Example: W 076 42 44.38 (76 degrees, 42 minutes, 44.38 seconds West)

Input Validation

The system automatically validates and formats inputs:

  • Designator: Automatically converted to uppercase, must be 3-10 letters
  • Latitude Degrees: Must be between 0-90, auto-padded to 2 digits
  • Longitude Degrees: Must be between 0-180, auto-padded to 3 digits
  • Minutes: Must be between 0-59, auto-padded to 2 digits
  • Seconds: Must be between 0-59.99, auto-formatted to 2 decimal places
  • Numeric Fields: Only numbers allowed (and decimal point for seconds)

Waypoint Types

  • ICAO: International Civil Aviation Organization waypoints - standard navigation points defined by ICAO
  • VOR: VHF Omnidirectional Range - radio navigation aid that provides bearing information
  • NDB: Non-Directional Beacon - radio navigation aid that provides bearing information
  • FIX: Fixed navigation point - a specific geographic location used for navigation

Waypoint Information

Each waypoint record includes:

  • Waypoint ID: Unique identifier
  • Designator: Waypoint code (3-10 uppercase letters)
  • Type: Waypoint type (ICAO, VOR, NDB, FIX)
  • Latitude: Latitude coordinates in degrees/minutes/seconds format
  • Longitude: Longitude coordinates in degrees/minutes/seconds format
  • Created Date: When the waypoint was added
  • Last Updated: When the waypoint was last modified

Use in Billing

Waypoints are used in AIRNAV per-mile billing to:

  • Calculate distances between waypoints along flight routes
  • Determine billing amounts based on distance traveled
  • Identify entry and exit points for airspace boundaries
  • Track flight paths for billing purposes

Important Notes

  • Waypoints require "Administration - Airports" permission
  • Designators must be unique - duplicate designators are not allowed
  • Coordinates must be accurate for proper billing calculations
  • Waypoint types help categorize navigation aids
  • Coordinates are stored in degrees/minutes/seconds format
  • Input fields automatically format and validate data
  • Waypoints are used during AIRNAV data processing and invoice generation
View Waypoints Add Waypoint

Handling Agents Management

Overview

Handling Agents Management allows you to manage handling agent records used in handling agent billing. Handling agents are ground service providers who provide services to aircraft at airports, including baggage handling, fueling, catering, and other ground support services.

Navigation

Navigate to Administration → Handling Agents

Submenu Options

  • View Handling Agents: View all handling agent records in the system
  • Add Handling Agent: Create a new handling agent record
  • Edit Handling Agent: Modify existing handling agent information

How to View Handling Agents

  1. Navigate to Administration → Handling Agents → View Handling Agents
  2. The page displays a table of all handling agents
  3. Use the search box to search by handling agent name or code
  4. Click on column headers to sort the table
  5. Use pagination controls to navigate through multiple pages

How to Add a Handling Agent

  1. Navigate to Administration → Handling Agents → Add Handling Agent
  2. Enter the handling agent information:
    • Handling Agent Name: Business or legal name (required)
    • Handling Agent Code: Unique identifier code (required)
    • Contact Information: Address, phone, email
    • Status: Active or Inactive
  3. Click Add Handling Agent to save

Handling Agent Information

Each handling agent record includes:

  • Handling Agent ID: Unique identifier
  • Handling Agent Name: Business name
  • Handling Agent Code: Unique code used in billing
  • Contact Details: Address, phone, email
  • Status: Active or Inactive
  • Created Date: When the record was created

Important Notes

  • Handling agents must be created before processing handling agent data files
  • Handling agent codes must be unique
  • Only active handling agents appear in dropdowns during data processing
  • Handling agents are linked to invoices during invoice generation
Handling Agents Management

Aircraft Types Management

Overview

Aircraft Types Management allows you to manage aircraft type definitions used for billing calculations. Aircraft types are used to determine billing rates and charges based on the type of aircraft operating flights.

Navigation

Navigate to Administration → Aircraft Types

Submenu Options

  • View Aircraft Types: View all aircraft type definitions
  • Add Aircraft Type: Create a new aircraft type definition
  • Edit Aircraft Type: Modify existing aircraft type information

How to View Aircraft Types

  1. Navigate to Administration → Aircraft Types → View Aircraft Types
  2. The page displays a table of all aircraft types
  3. Use the search box to search by aircraft type code or description
  4. Click on column headers to sort
  5. Use pagination to navigate through results

How to Add an Aircraft Type

  1. Navigate to Administration → Aircraft Types → Add Aircraft Type
  2. Enter the aircraft type information:
    • Aircraft Type Code: ICAO aircraft type code (e.g., B737, A320) (required)
    • Aircraft Type Description: Full description (e.g., Boeing 737-800)
    • Wake Turbulence Category: Light, Medium, Heavy, or Super
    • Maximum Takeoff Weight: Weight in kilograms
    • Status: Active or Inactive
  3. Click Add Aircraft Type to save

Aircraft Type Information

Each aircraft type record includes:

  • Aircraft Type ID: Unique identifier
  • Aircraft Type Code: ICAO code (e.g., B737, A320)
  • Description: Full aircraft type name
  • Wake Turbulence Category: Used for billing calculations
  • Maximum Takeoff Weight: Used for weight-based billing
  • Status: Active or Inactive

Important Notes

  • Aircraft types are used during invoice generation to determine charges
  • Aircraft type codes should match ICAO standards
  • Wake turbulence categories affect billing rates
  • Only active aircraft types are used in billing calculations
Aircraft Types Management

Airports Management

Overview

Airports Management allows you to manage airport and vendor airport records. Airports are used in PASC billing to identify which airport passenger service charges are collected from. Vendor airports are specific airport locations used in billing calculations.

Navigation

Navigate to Administration → Airports

Submenu Options

  • View Airports: View all airport records
  • Add Airport: Create a new airport record
  • Edit Airport: Modify existing airport information
  • View Vendor Airports: View vendor airport records
  • Add Vendor Airport: Create a new vendor airport record

How to View Airports

  1. Navigate to Administration → Airports → View Airports
  2. The page displays a table of all airports
  3. Use the search box to search by airport code, name, or IATA code
  4. Click on column headers to sort
  5. Use pagination to navigate through results

How to Add an Airport

  1. Navigate to Administration → Airports → Add Airport
  2. Enter the airport information:
    • Airport Name: Full airport name (required)
    • IATA Code: 3-letter IATA code (e.g., JFK, LAX) (required)
    • ICAO Code: 4-letter ICAO code (optional)
    • Country: Country where airport is located
    • City: City where airport is located
    • Status: Active or Inactive
  3. Click Add Airport to save

Vendor Airports

Vendor airports are specific airport locations used in billing. They may differ from standard airports and are used for more granular billing purposes.

How to View Vendor Airports

  1. Navigate to Administration → Airports → View Vendor Airports
  2. The page displays a table of all vendor airports
  3. Search and filter as needed

Airport Information

Each airport record includes:

  • Airport ID: Unique identifier
  • Airport Name: Full name
  • IATA Code: 3-letter code
  • ICAO Code: 4-letter code (if available)
  • Location: City and country
  • Status: Active or Inactive

Important Notes

  • Airports are used in PASC billing to identify charge sources
  • IATA codes must be unique and follow standard format
  • Only active airports appear in dropdowns during data processing
  • Vendor airports allow for more specific billing locations
Airports Management

Users Management (IT Admin Only)

Overview

Users Management allows IT Administrators to manage user accounts for the system. The system supports multiple user types: internal admin users, external users (airport, TEF, IATA), and customer users.

Navigation

Navigate to Administration → Users

Submenu Options

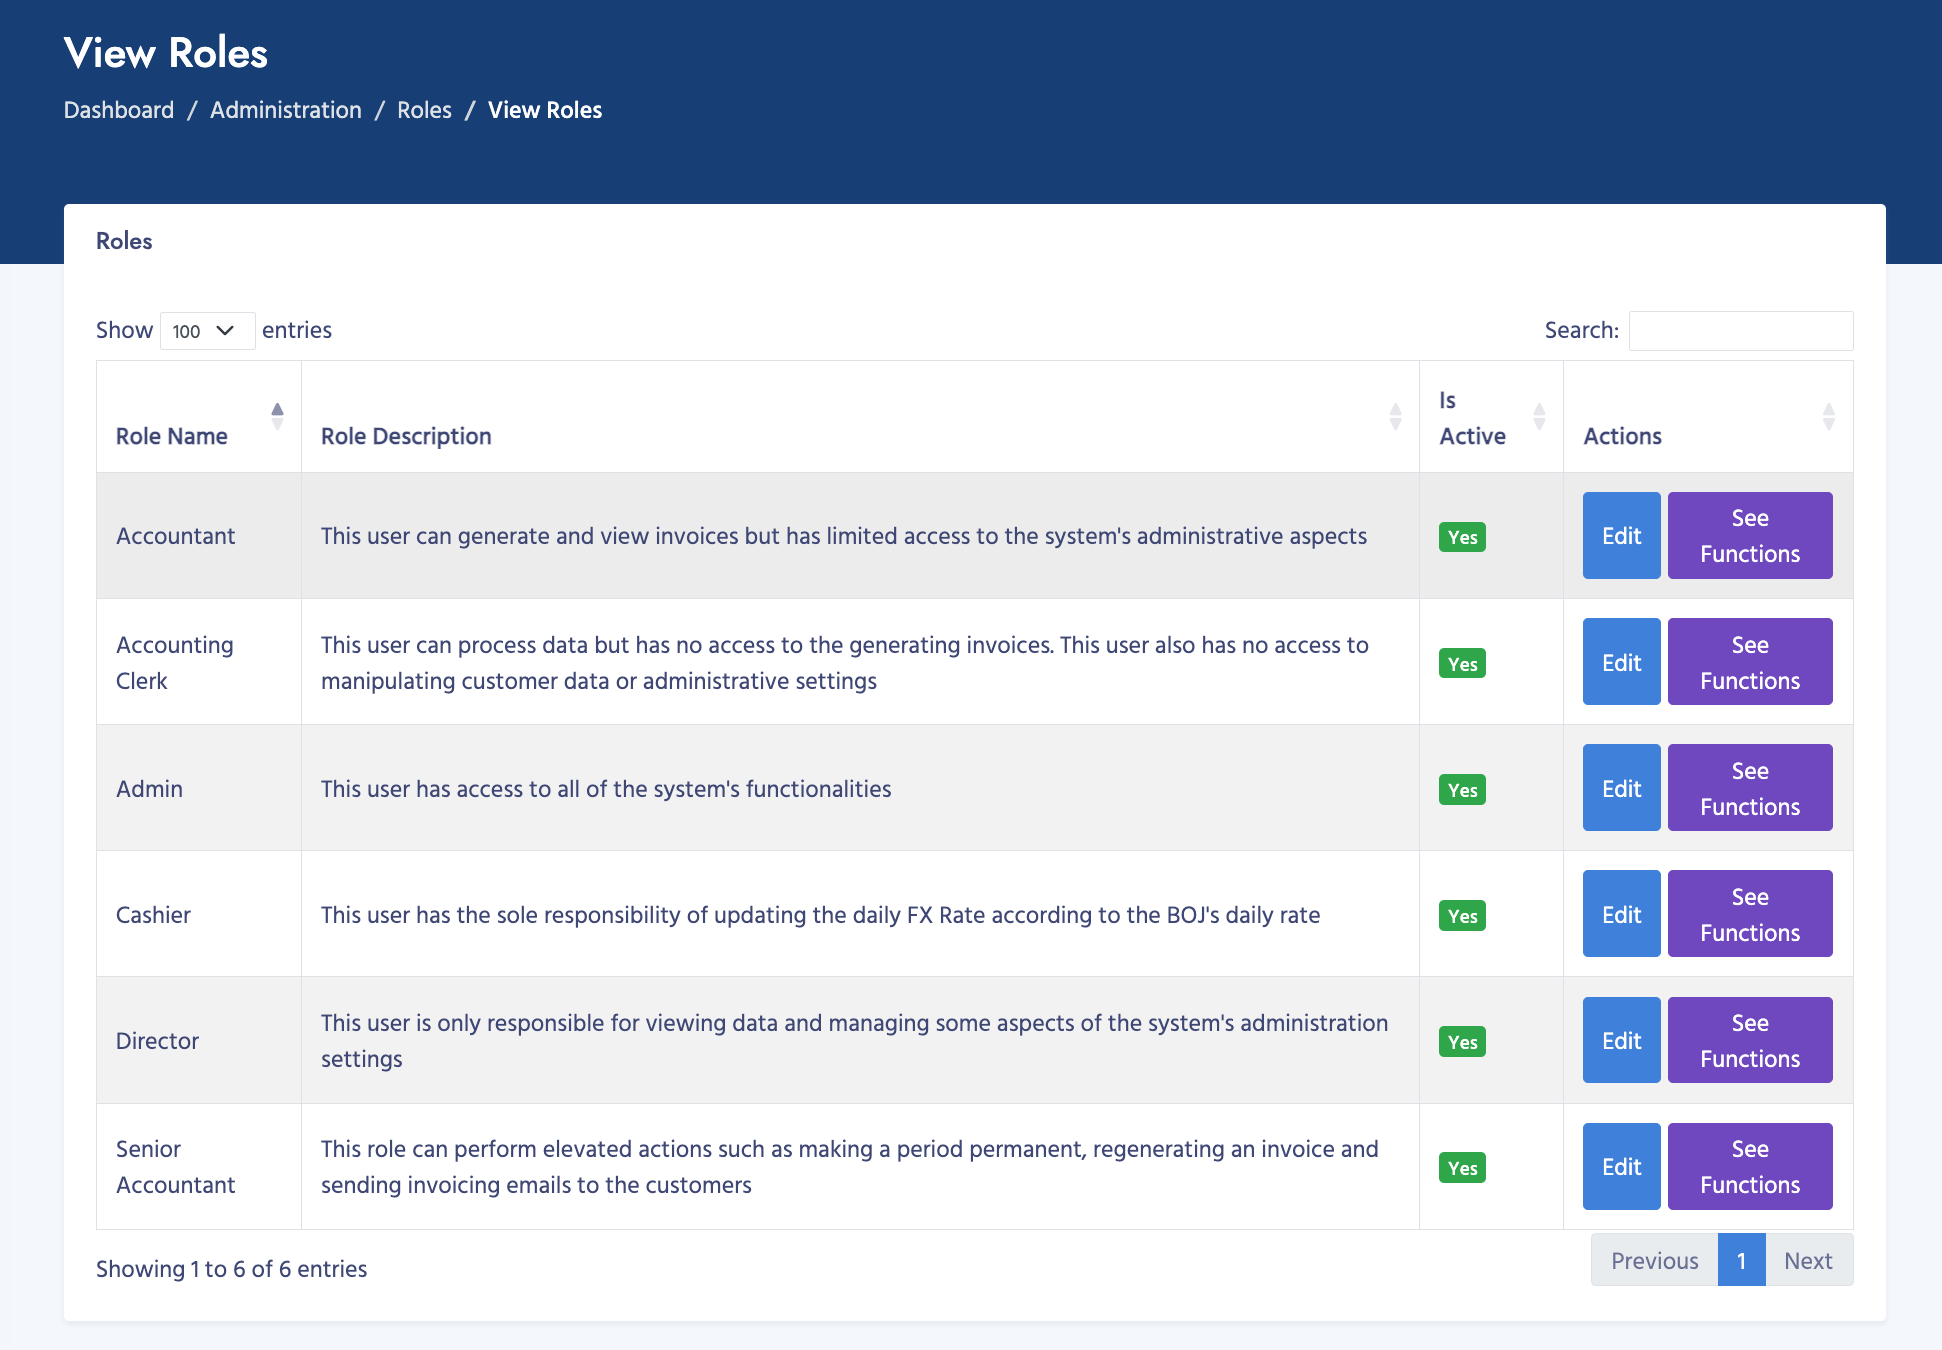
  • View Users: View all internal/admin user accounts
  • Add User: Create a new internal/admin user account
  • View External Users: View all external user accounts (Airport, TEF, IATA)
  • Add External User: Create a new external user account
  • View Customer Users: View all customer portal user accounts
  • Add Customer User: Create a new customer portal user account

User Types

  • Internal Users (Admin): System administrators and internal staff with full access to admin portal
  • External Airport Users: Airport staff with access to airport-specific portal and features
  • External TEF Users: TEF (Tourism Enhancement Fund) staff with access to TEF portal
  • External IATA Users: IATA staff with access to IATA-specific portal
  • Customer Users: Customer portal users who can view invoices and make payments for their organization

Internal Users (Admin)

Internal users are system administrators and internal staff who have access to the main admin portal with full system capabilities.

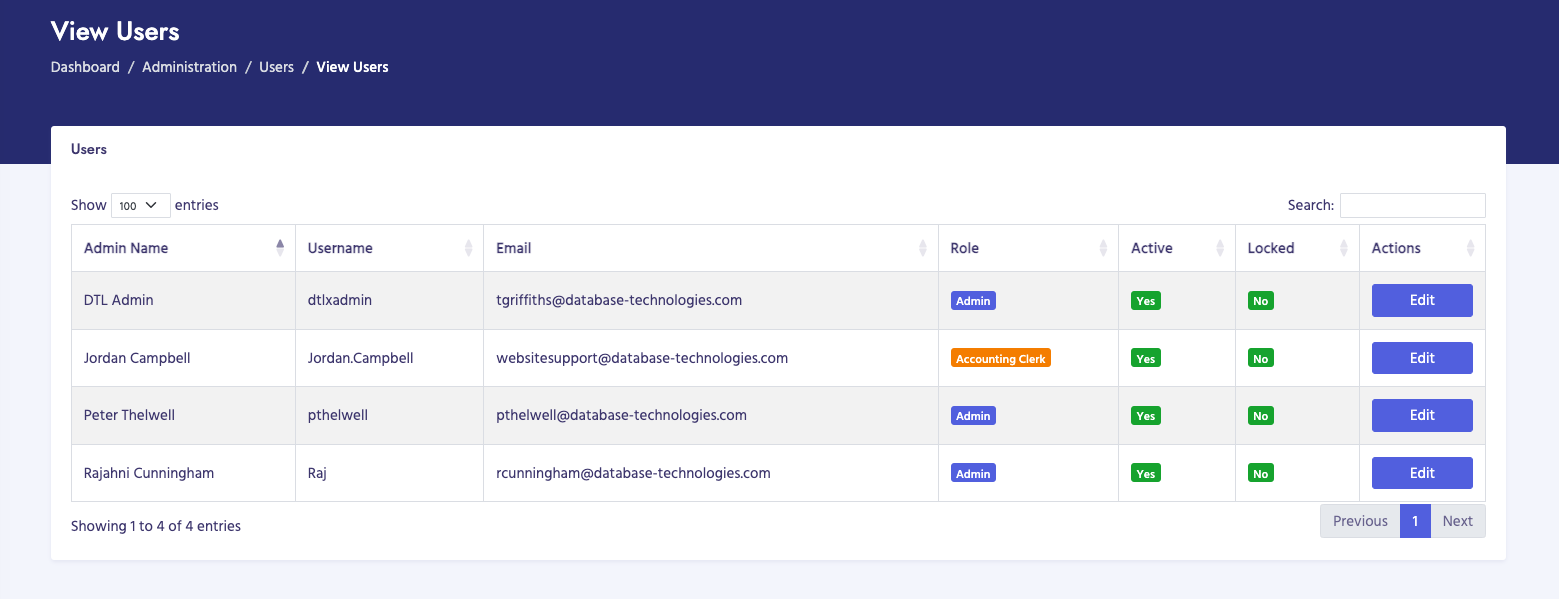
How to View Internal Users

  1. Navigate to Administration → Users → View Users
  2. The page displays a table of all internal/admin users
  3. Use search to find specific users by name, email, or username
  4. Click on column headers to sort
  5. Click on a user to view or edit details

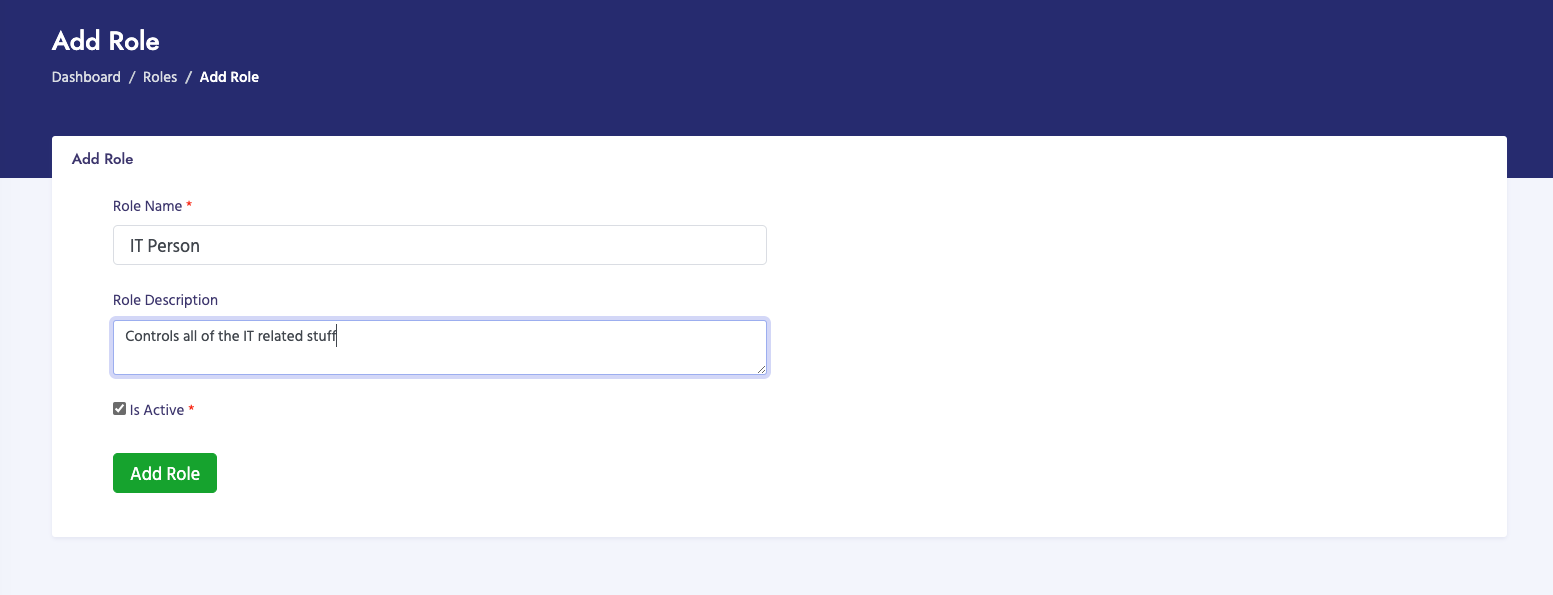
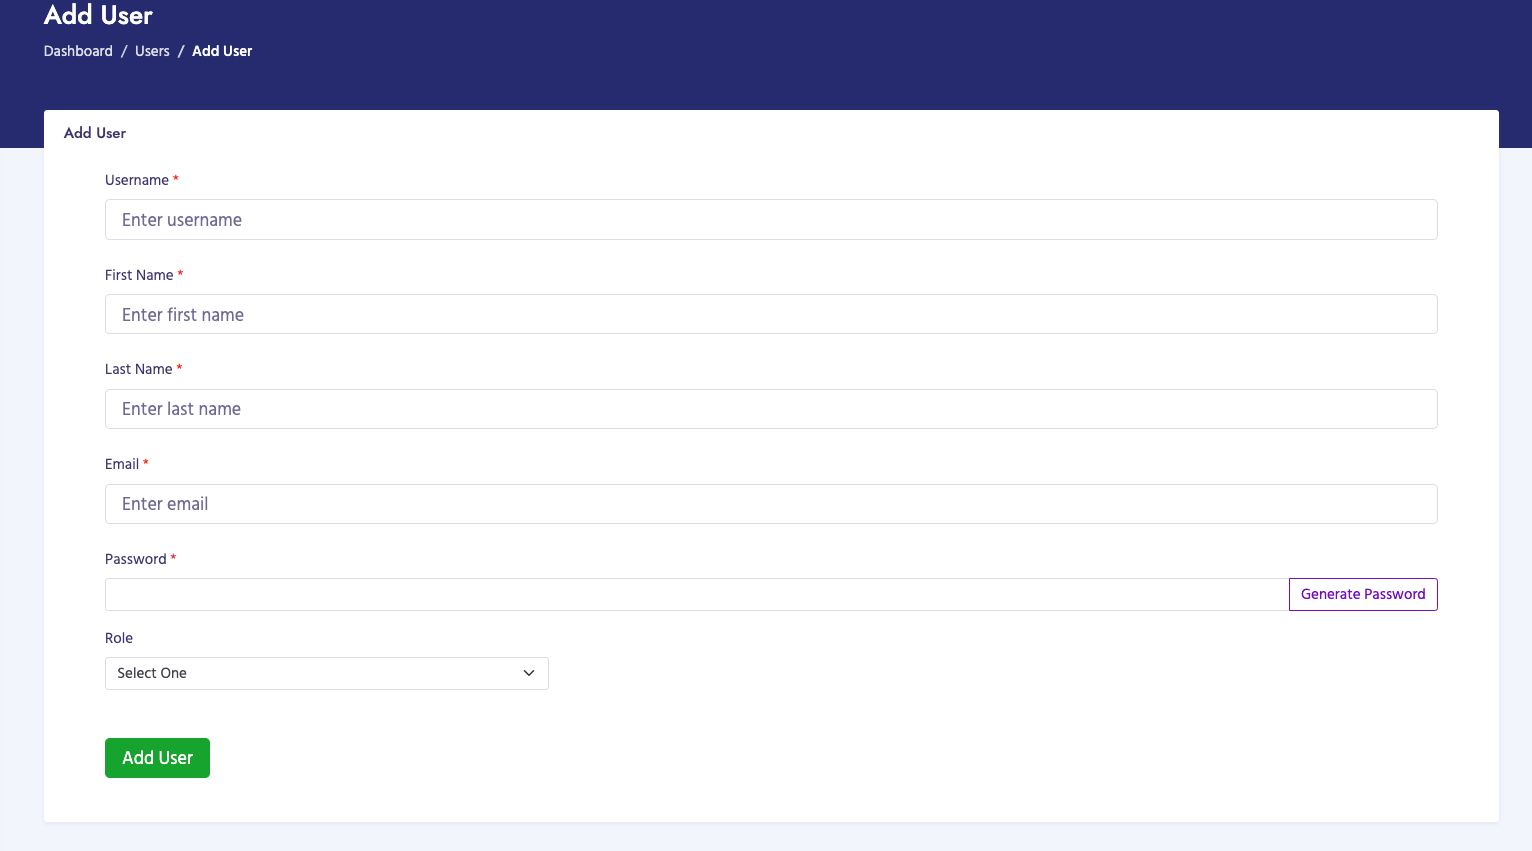
How to Add an Internal User

  1. Navigate to Administration → Users → Add User
  2. Enter user information:
    • First Name: User's first name (required)
    • Last Name: User's last name (required)
    • Email: Email address (required, must be unique)
    • Username: Login username (required, must be unique)
    • Password: Initial password (required)
    • Role: Select user role from dropdown (determines permissions)
    • Status: Active or Inactive
  3. Click Add User to save
View Internal Users Add Internal User

External Users

External users are staff from external organizations (Airport, TEF, IATA) who have access to specific portals with limited functionality based on their organization type.

External User Types

  • IATA Users: Staff from IATA with access to IATA portal
  • TEF Users: Staff from Tourism Enhancement Fund with access to TEF portal
  • Airport Users: Airport staff with access to airport portal (requires airport selection)

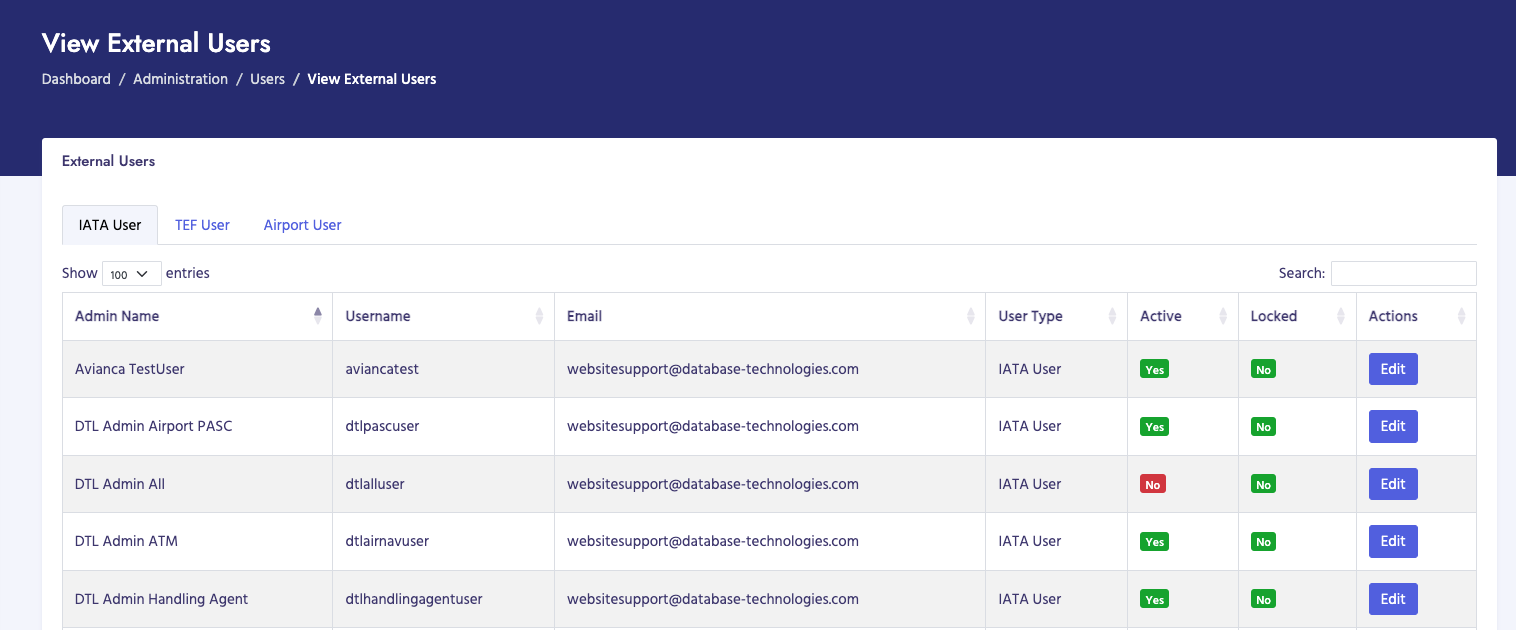
How to View External Users

  1. Navigate to Administration → Users → View External Users
  2. The page displays a table of all external users
  3. Users are shown with their type (IATA, TEF, or Airport)
  4. Use search to find specific users
  5. Click on column headers to sort
  6. Click on a user to view or edit details

How to Add an External User

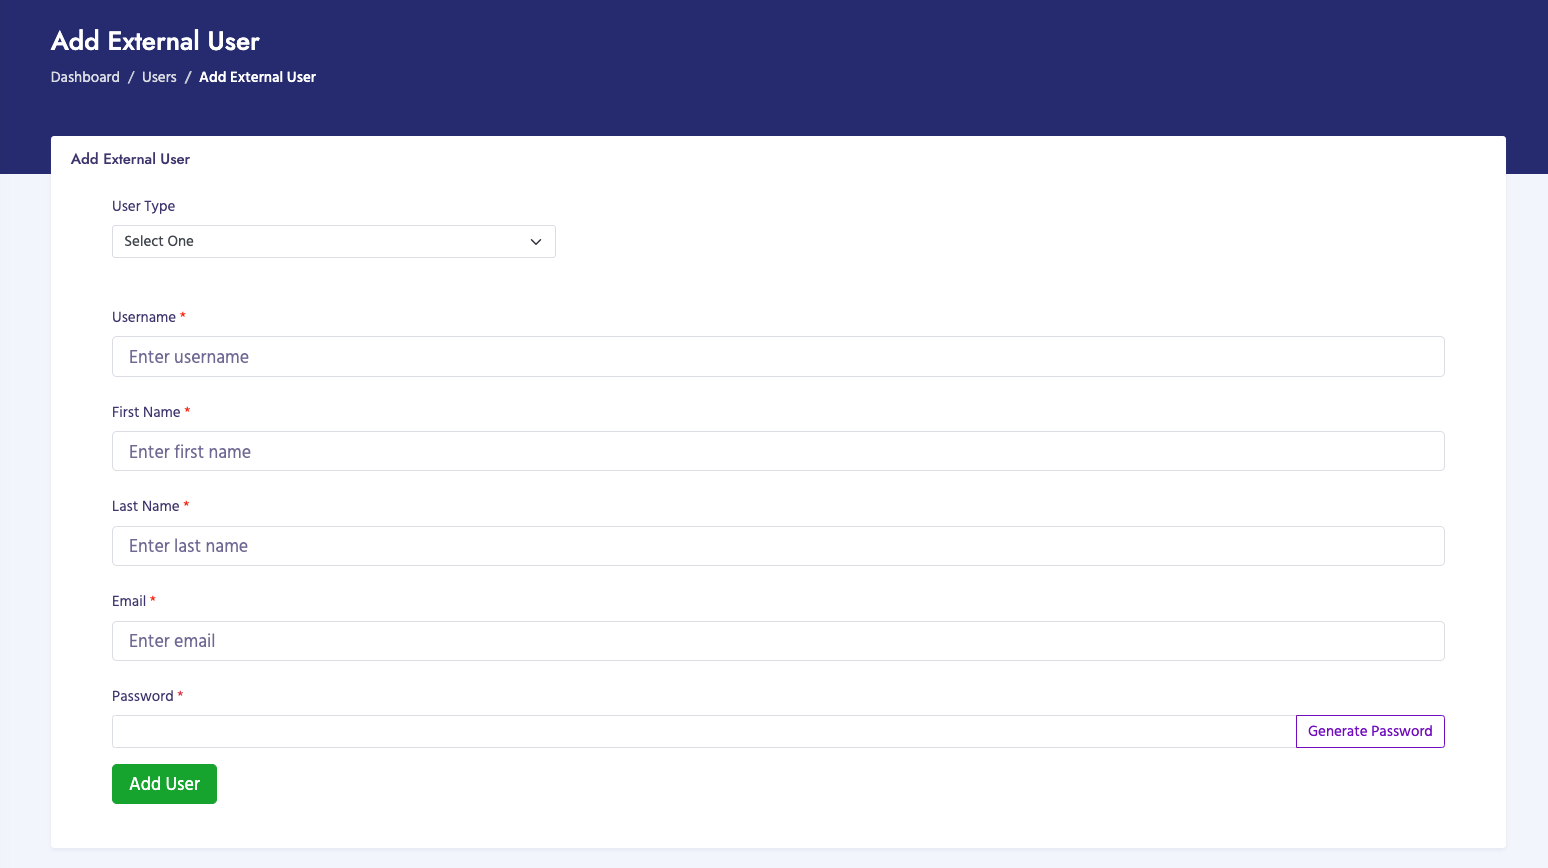
  1. Navigate to Administration → Users → Add External User
  2. Select the User Type from dropdown:
    • IATA User: For IATA staff
    • TEF User: For TEF staff
    • Airport User: For airport staff (requires airport selection)
  3. Enter user information:
    • Username: Login username (required, must be unique)
    • First Name: User's first name (required)
    • Last Name: User's last name (required)
    • Email: Email address (required, must be unique)
    • Password: Initial password (required)
    • Airport: If Airport User type selected, choose the airport (required for airport users)
    • Status: Active or Inactive
  4. Click Add External User to save

External User Information

Each external user record includes:

  • User ID: Unique identifier
  • User Type: IATA User, TEF User, or Airport User
  • Name: First and last name
  • Email: Email address
  • Username: Login username
  • Airport: Associated airport (for Airport Users only)
  • Status: Active or Inactive
  • Last Login: Last login date and time
  • Created Date: When account was created
View External Users Add External User

Customer Users

Customer users are users who have access to the customer portal. They can view invoices, make payments, and access customer-specific features for their organization. Customer users are linked to customer accounts (PACID).

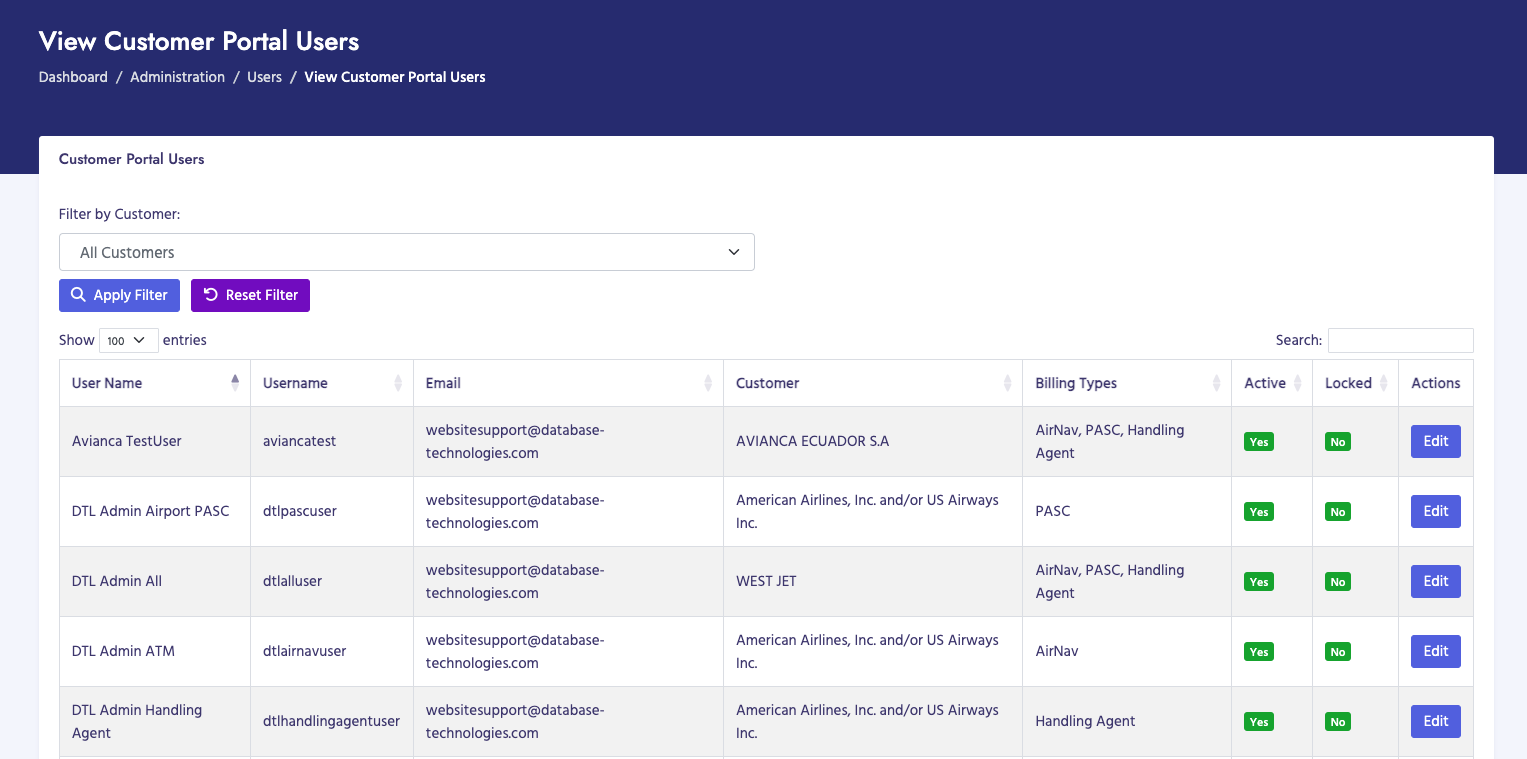
How to View Customer Users

  1. Navigate to Administration → Users → View Customer Users
  2. The page displays a table of all customer portal users
  3. Users are shown with their associated customer (PACID and customer name)
  4. Use search to find specific users or customers
  5. Click on column headers to sort
  6. Click on a user to view or edit details

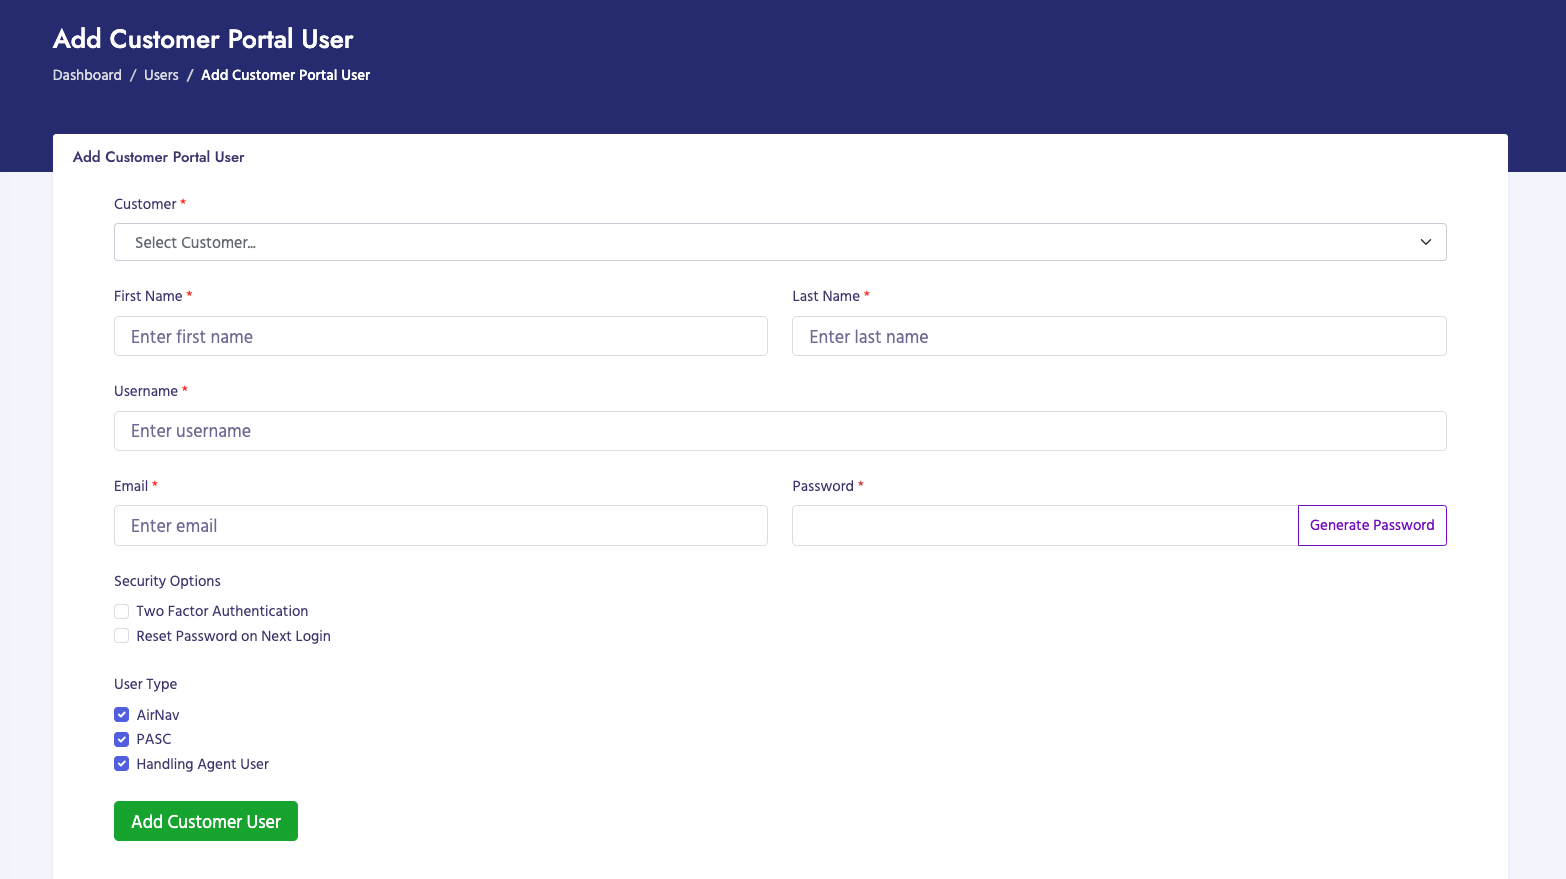
How to Add a Customer User

  1. Navigate to Administration → Users → Add Customer User
  2. Select the Customer from dropdown (required):
    • Uses Select2 for enhanced search
    • Shows customer name and PACID
    • Customer must exist in the system
  3. Enter user information:
    • First Name: User's first name (required)
    • Last Name: User's last name (required)
    • Username: Login username (required, must be unique)
    • Email: Email address (required, must be unique)
    • Password: Initial password (required)
    • Status: Active or Inactive
  4. Click Add Customer User to save

Customer User Information

Each customer user record includes:

  • User ID: Unique identifier
  • Customer: Associated customer name and PACID
  • Name: First and last name
  • Email: Email address
  • Username: Login username
  • Status: Active or Inactive
  • Last Login: Last login date and time
  • Created Date: When account was created
View Customer Users Add Customer User

Customer User Capabilities

Customer users can:

  • View invoices for their organization
  • Make payments on invoices
  • View payment history
  • Access customer portal features
  • View account information

User Information Summary

All user types share common information fields:

  • User ID: Unique identifier
  • Name: First and last name
  • Email: Email address (must be unique)
  • Username: Login username (must be unique)
  • Status: Active or Inactive
  • Last Login: Last login date and time
  • Created Date: When account was created

Important Notes

  • Only IT Administrators can manage users (requires "Administration - Users" permission)
  • Internal users have roles that determine permissions in the admin portal
  • External users have access to specific portals based on their type
  • Customer users are automatically linked to customer accounts (PACID)
  • Inactive users cannot log in
  • Email addresses and usernames must be unique across all user types
  • Airport users require an airport to be selected during creation
  • Customer users can only access data for their associated customer account

Roles Management (IT Admin Only)

Overview

Roles Management allows IT Administrators to manage user roles and permissions. Roles define what features and functions users can access. You can view roles, create new roles, modify existing roles, and manage user role exceptions.

Navigation

Navigate to Administration → Roles

Submenu Options

  • View Roles: View all roles and their permissions
  • Add Role: Create a new role with custom permissions
  • Edit Role: Modify existing role permissions
  • Role Exceptions: Manage user-specific role exceptions

How to View Roles

  1. Navigate to Administration → Roles → View Roles
  2. The page displays a table of all roles
  3. Click on a role to view its permissions
  4. See which users are assigned to each role

How to Add a Role

  1. Navigate to Administration → Roles → Add Role
  2. Enter role information:
    • Role Name: Name of the role (required)
    • Role Description: Description of the role's purpose
  3. Select permissions for the role:
    • Check boxes for each feature/function the role should have access to
    • For each permission, select: Full Access (Y), View-Only (V), or No Access (N)
    • Permissions are organized by category (Billing, Invoices, Payments, etc.)
  4. Click Add Role to save

Permission Types

  • Full Access (Y): User can perform all actions (create, edit, delete, view)
  • View-Only (V): User can only view data, cannot modify
  • No Access (N): User cannot access the feature at all

Role Exceptions

Role exceptions allow you to override role permissions for specific users. This is useful when a user needs different permissions than their role normally provides.

How to Manage Role Exceptions

  1. Navigate to Administration → Roles → Role Exceptions
  2. Select a user
  3. View their current role and permissions
  4. Add exceptions for specific permissions
  5. Exceptions override the role's default permissions

Common Roles

  • IT Administrator: Full access to all features including user and role management
  • Billing Administrator: Full access to billing processes, invoices, and payments
  • Billing Viewer: View-only access to invoices and reports
  • Customer Service: Access to customer management and messages

Important Notes

  • Only IT Administrators can manage roles
  • Role changes affect all users assigned to that role
  • Role exceptions allow individual user overrides
  • Permissions are checked on every page load
  • Removing a permission immediately affects all users with that role
View Roles Add Role Role Exceptions

Audit Logs (IT Admin Only)

Overview

Audit Logs allow IT Administrators to view system audit logs that track user actions and system changes. The audit log system records all significant actions performed by users, including data modifications, invoice generation, payment processing, and administrative changes.

Navigation

Navigate to Administration → Audit Logs

Submenu Options

  • Action Logs: View detailed action logs for all user activities

How to View Action Logs

  1. Navigate to Administration → Audit Logs → Action Logs
  2. The page displays a table of all logged actions
  3. Use filters to narrow down results:
    • User Type: Filter by Admin, Customer, Airport, TEF, or IATA users
    • Date Range: Filter by date range (from/to dates)
    • Action Type: Filter by specific action types
    • Search: Search by user name, action description, or IP address
  4. Click on column headers to sort
  5. Use pagination to navigate through results

Action Log Information

Each action log entry includes:

  • Audit ID: Unique log entry identifier
  • User ID: ID of the user who performed the action
  • User Name: Name of the user
  • Action Portal: Which portal the action was performed in (Admin, Customer, Airport, etc.)
  • Action Description: Description of what action was performed
  • Result: Success or failure status
  • Action Date/Time: When the action occurred
  • IP Address: IP address of the user
  • Browser: Browser and version used
  • Country: Country location (if available)

Tracked Actions

The system tracks various types of actions including:

  • Data Processing: File uploads, data processing, batch operations
  • Invoice Operations: Invoice generation, modifications, status changes
  • Payment Operations: Payment recording, confirmations, refunds
  • Customer Management: Customer additions, modifications, deletions
  • Administrative Changes: Parameter changes, user management, role changes
  • Login Activities: User logins, logout attempts

Export Functionality

You can export audit logs for reporting and compliance:

  • Export filtered results to CSV
  • Export to Excel format
  • Print audit log reports

Important Notes

  • Only IT Administrators can view audit logs
  • Audit logs are read-only - they cannot be modified
  • Logs are retained for compliance and security purposes
  • Use filters to find specific actions or users
  • Audit logs help track system changes and user activities
Audit Logs

IP Whitelist Management (IT Admin Only)

Overview

IP Whitelist Management allows IT Administrators to manage IP address whitelist for system access control. This feature allows you to restrict system access to specific IP addresses or IP address ranges, enhancing security by only allowing connections from approved locations.

Navigation

Navigate to Administration → IP Whitelist Management

How to View IP Whitelist

  1. Navigate to Administration → IP Whitelist Management
  2. The page displays a table of all whitelisted IP addresses
  3. View IP addresses, CIDR ranges, and status
  4. See when each IP was added and by whom

How to Add an IP Address

  1. Navigate to Administration → IP Whitelist Management
  2. Click Add IP Address
  3. Enter IP address information:
    • IP Address: Enter IPv4 address (e.g., 192.168.1.100) or CIDR notation (e.g., 192.168.1.0/24)
    • Description: Optional description (e.g., "Office Network", "VPN Server")
    • Status: Active or Inactive
  4. Click Add IP to save

IP Address Formats

The system supports two IP address formats:

  • Single IP Address: Specific IP address (e.g., 192.168.1.100)
    • Only this exact IP address will be allowed
  • CIDR Notation: IP range using CIDR notation (e.g., 192.168.1.0/24)
    • Allows a range of IP addresses
    • /24 means first 24 bits are fixed (allows 192.168.1.0 to 192.168.1.255)
    • /16 means first 16 bits are fixed (allows 192.168.0.0 to 192.168.255.255)

How to Edit an IP Address

  1. Find the IP address in the table
  2. Click Edit button
  3. Modify the IP address, description, or status
  4. Click Save to update

How to Delete an IP Address

  1. Find the IP address in the table
  2. Click Delete button
  3. Confirm the deletion
  4. The IP address will be removed from the whitelist

IP Whitelist Information

Each whitelist entry includes:

  • IP Address: The whitelisted IP or CIDR range
  • Description: Optional description
  • Status: Active or Inactive
  • Created By: User who added the IP
  • Created Date: When the IP was added
  • Last Modified: Last modification date

How IP Whitelisting Works

  • When IP whitelisting is enabled, only whitelisted IPs can access the system
  • Users attempting to access from non-whitelisted IPs will be blocked
  • Inactive IPs in the whitelist are ignored
  • CIDR ranges allow multiple IPs to be whitelisted at once

Important Notes

  • Only IT Administrators can manage IP whitelist
  • Be careful when adding IPs - incorrect entries can lock you out
  • Use CIDR notation for office networks or VPN ranges
  • Test IP whitelist changes carefully
  • Keep a record of your own IP address in case you need to access remotely
  • Inactive entries remain in the list but don't affect access control

Utility Parameters (IT Admin Only)

Overview

Utility Parameters allow IT Administrators to view and configure system-wide utility parameters and settings. These parameters control various system behaviors, configurations, and operational settings that affect how the system functions.

Navigation

Navigate to Administration → Utility Parameters

How to View Utility Parameters

  1. Navigate to Administration → Utility Parameters
  2. The page displays a list of all utility parameters
  3. View parameter names, values, descriptions, and categories
  4. Parameters are organized by category for easier navigation

How to Edit Utility Parameters

  1. Navigate to Administration → Utility Parameters
  2. Find the parameter you want to modify
  3. Click Edit button for that parameter
  4. Modify the parameter value
  5. Review the parameter description to understand what it controls
  6. Click Save to update the parameter

Parameter Categories

Utility parameters are organized into categories such as:

  • System Configuration: Core system settings
  • Email Settings: Email server and notification settings
  • File Upload: File upload limits and configurations
  • Security Settings: Security-related parameters
  • Display Settings: UI and display configurations
  • Integration Settings: Third-party integration parameters

Common Utility Parameters

Some common utility parameters include:

  • Session Timeout: How long user sessions remain active
  • File Upload Size Limit: Maximum file size for uploads
  • Email From Address: Default sender email address
  • System Maintenance Mode: Enable/disable maintenance mode
  • Password Policy: Password requirements and expiration
  • Log Retention Period: How long logs are kept

Parameter Information

Each parameter includes:

  • Parameter Name: Unique identifier for the parameter
  • Parameter Value: Current value of the parameter
  • Description: What the parameter controls
  • Category: Parameter category
  • Data Type: Type of value (string, integer, boolean, etc.)
  • Last Modified: When the parameter was last changed
  • Modified By: User who last modified it

Important Notes

  • Only IT Administrators can view and modify utility parameters
  • Changes to parameters may affect system behavior immediately
  • Review parameter descriptions carefully before making changes
  • Some parameters may require system restart to take effect
  • Keep a record of parameter changes for troubleshooting
  • Incorrect parameter values can cause system issues