Great Plains Export

Guide to exporting invoice and payment data to Great Plains accounting system

Great Plains Export Overview

Overview

The Great Plains Export feature allows you to export invoice and payment data from the JCAA Billing System to Microsoft Dynamics GP (Great Plains) accounting software. This integration enables seamless transfer of financial data for accounting and reporting purposes.

Export Types

  • Invoices Export: Export invoice data for billing periods that have been finalized (permanent status)
  • Payment Export: Export payment/receipt data for specified date ranges

Export Formats

All exports are generated as CSV (Comma-Separated Values) files that are compatible with Great Plains import functionality:

  • Files are formatted according to Great Plains requirements
  • Data includes all necessary fields for accounting integration
  • Files can be directly imported into Great Plains

Permissions

Great Plains Export access is controlled by permissions:

  • Great Plains Export: General permission for all GP export features
  • GP Export - Invoices: Specific permission for invoice exports (if separate permission exists)
  • GP Export - Payments: Specific permission for payment exports (if separate permission exists)

Note: Users with "Great Plains Export" permission have access to both invoice and payment exports. Separate permissions may exist for more granular control.

When to Use Great Plains Export

  • After invoices have been finalized (permanent status)
  • When you need to transfer invoice data to accounting systems
  • For monthly or periodic accounting reconciliation
  • To export payment records for cash receipt processing
  • For financial reporting and audit purposes

Invoices Export

Overview

The Invoices Export feature allows you to export invoice data for billing periods that have been finalized. The system generates CSV files containing invoice information formatted for Great Plains import.

How to Export Invoices

  1. Navigate to Billing Process → Great Plains Export → Invoices Export
  2. Select the Year from the dropdown menu (defaults to current year)
  3. Review the available billing periods in the tabs:
    • Airnav Tab: Shows AIRNAV billing periods with GP files
    • Airport PASC Tab: Shows PASC billing periods with GP files
    • Handling Agent Tab: Shows Handling Agent billing periods with GP files
  4. Each tab displays a table showing:
    • Period (start and end dates)
    • Number of invoices
    • Total flights
    • Total charges in USD
    • Download button
  5. Click the Download button for the period you want to export
  6. The CSV file will be downloaded to your computer

Export Requirements

  • Period Status: Only billing periods with "permanent" status are available for export
  • GP File Generated: The system must have generated a GP file for the period (this happens automatically when invoices are made permanent)
  • Invoices Exist: The period must have invoices that have been generated

CSV File Format

The exported CSV file contains the following columns:

  • DOC DATE: Document date (current date in M/D/Y format)
  • NEW: Customer PACID (new customer identifier)
  • OLD: Old customer identifier (typically empty)
  • Customer: Customer name
  • DOC #: Invoice number (or TEMP-ID if not finalized)
  • DOC AMT: Invoice amount (formatted with 2 decimal places)
  • Comments: Status comment (typically "Scheduled")

File Naming Convention

Exported files are named using the following format:

  • GP_Data_YYYY-MM-DD_to_YYYY-MM-DD_[BillingType].csv
  • Example: GP_Data_2024-01-01_to_2024-01-31_AIRNAV.csv

Export Process

When you download an invoice export:

  1. The system retrieves all invoices for the selected billing period
  2. For each invoice, it fetches customer information
  3. Data is formatted according to Great Plains requirements
  4. A CSV file is generated with all invoice records
  5. The file is saved to the server and made available for download
  6. The file path is stored in the billing_periods table for future reference

Data Included in Export

For each invoice, the export includes:

  • Invoice date (current date)
  • Customer PACID (for customer matching in Great Plains)
  • Customer name
  • Invoice number
  • Invoice total amount
  • Status comment

Billing Type Tabs

The export page organizes periods by billing type in separate tabs:

  • Airnav Tab: Shows AIRNAV billing periods
  • Airport PASC Tab: Shows PASC billing periods
  • Handling Agent Tab: Shows Handling Agent billing periods

Each tab displays only periods for that specific billing type that have been finalized and have GP files generated.

Year Filtering

The year dropdown allows you to filter periods by billing year:

  • Default: Current year
  • Available years: Current year and previous 5 years
  • Changing the year updates all three tabs automatically

Important Notes

  • Only permanent billing periods appear in the export list
  • GP files are automatically generated when invoices are made permanent
  • Each billing period can only have one GP export file
  • If you need to regenerate an export, you may need to contact the system administrator
  • Exported files are stored on the server and can be downloaded multiple times
  • The file path is saved in the database for tracking purposes
  • Invoice amounts are exported in USD
  • All invoices for a period are included in a single export file

Using the Exported File

After downloading the CSV file:

  1. Open the file in Excel or a text editor to review the data
  2. Verify that all expected invoices are included
  3. Check that amounts and customer information are correct
  4. Import the file into Great Plains using the standard import process
  5. Verify the import was successful in Great Plains
Invoices Export

Payment Export

Overview

The Payment Export feature allows you to export payment/receipt data for specified date ranges. This export is used to transfer cash receipt information to Great Plains for accounting reconciliation.

How to Export Payments

  1. Navigate to Billing Process → Great Plains Export → Payment Export
  2. The page displays a filter section with various options
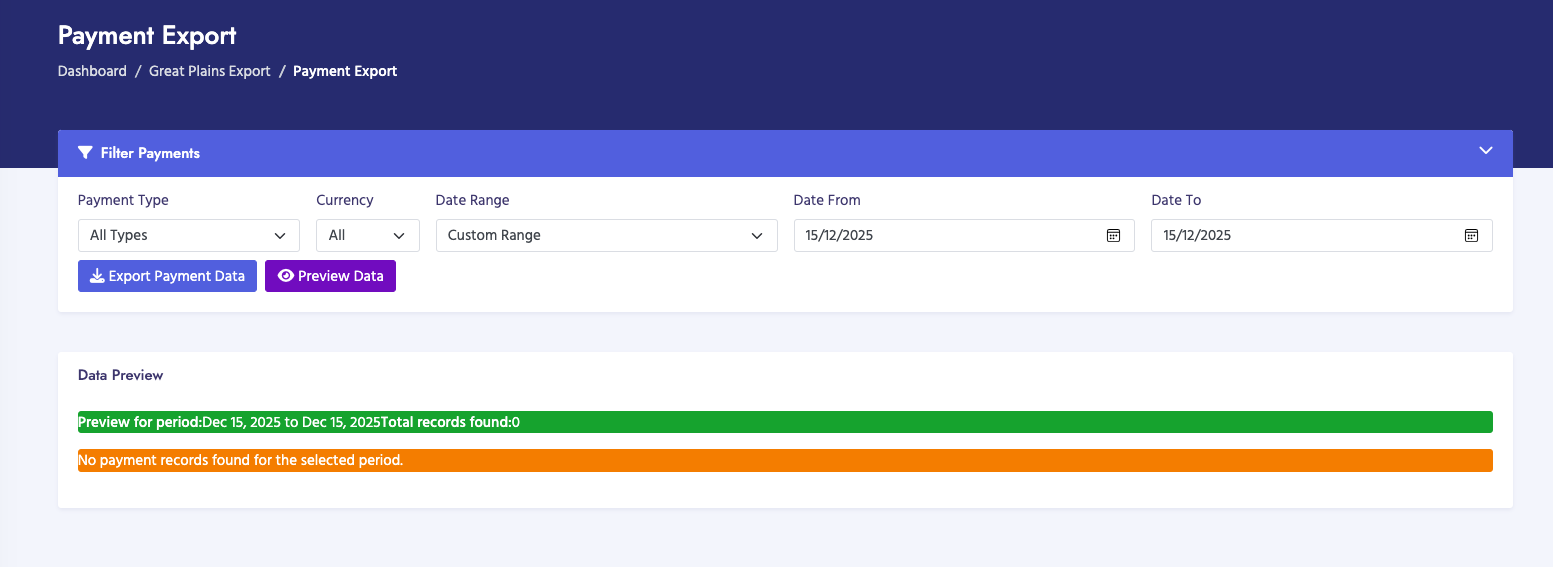
  3. Configure your export filters:
    • Payment Type: Select "All Types", "Credit Card", or "Wire Transfer"
    • Currency: Select "All", "USD", or "JMD"
    • Date Range: Select a predefined range or "Custom Range"
    • Date From / Date To: If using custom range, specify start and end dates
  4. Optionally, click Preview Data to see what will be exported before downloading
  5. Click Export Payment Data to generate and download the CSV file
  6. The file will be downloaded automatically to your computer

Filter Options

The export page provides several filtering options:

Payment Type Filter

  • All Types: Export all payment types (default)
  • Credit Card: Export only credit card payments
  • Wire Transfer: Export only wire transfer/bank payments

Currency Filter

  • All: Export payments in all currencies (default)
  • USD: Export only USD payments
  • JMD: Export only JMD payments

Date Range Options

  • Custom Range: Specify your own start and end dates
  • Today: Export payments from today only
  • Yesterday: Export payments from yesterday only
  • This Week: Export payments from Monday to Sunday of current week
  • This Month: Export payments from the 1st to last day of current month
  • This Quarter: Export payments from the start to end of current quarter
  • This Year: Export payments from January 1st to December 31st of current year

CSV File Format

The exported CSV file contains the following columns:

  • ECommCashReceiptNum: Receipt ID (unique payment identifier)
  • CustomerID: Customer PACID
  • DocumentDate: Payment date (formatted as DD/MM/YYYY)
  • CurrencyID: Currency symbol (US$ for USD, JM$ for JMD)
  • DocumentAmount: Payment amount
  • CheckCardNumber: Payment reference number:
    • For credit cards: Invoice number + last 4 digits of card
    • For wire transfers: Invoice number + bank account
    • For other types: Invoice number + "0000"
  • ApplytoInvoiceNumber: Invoice number that the payment applies to
  • ApplyAmountToInvoice: Amount applied to the invoice

File Naming Convention

Exported files are named using the following format:

  • CashReceiptExport_YYYY-MM-DD_to_YYYY-MM-DD.csv
  • Example: CashReceiptExport_2024-01-01_to_2024-01-31.csv

Export Process

When you export payment data:

  1. The system queries the payment database based on your filter criteria
  2. Only payments with status "Paid" or "Completed" are included
  3. Payments are filtered by date range, payment type, and currency
  4. Data is formatted according to Great Plains cash receipt requirements
  5. A CSV file is generated with all matching payment records
  6. The file is sent directly to your browser for download

Payment Status Filtering

The export automatically includes only payments with the following statuses:

  • Paid: Payments that have been fully processed
  • Completed: Payments that have been completed

Pending, failed, or cancelled payments are not included in the export.

CheckCardNumber Formatting

The CheckCardNumber field is formatted differently based on payment type:

  • Credit Card Payments:
    • Format: Invoice Number + Last 4 digits of card
    • Example: "INV-2024-0011234" (where "1234" are last 4 digits)
  • Wire Transfer Payments:
    • Format: Invoice Number + Bank Account
    • Example: "INV-2024-001ACC123456"
  • Other Payment Types:
    • Format: Invoice Number + "0000"
    • Example: "INV-2024-0010000"

Currency Handling

The export handles multiple currencies:

  • USD Payments: CurrencyID shows as "US$"
  • JMD Payments: CurrencyID shows as "JM$"
  • You can filter by currency or export all currencies together

Date Range Selection

When you select a predefined date range:

  • The "Date From" and "Date To" fields are automatically populated
  • You can still modify these dates manually if needed
  • If you select "Custom Range", you must manually enter both dates
  • The system uses the date input values if provided, otherwise uses the selected period

Preview Functionality

Before exporting, you can preview the data:

  • Click Preview Data to see a sample of what will be exported
  • The preview shows payment records matching your filter criteria
  • This helps verify that you're exporting the correct data
  • You can adjust filters and preview again before exporting

Important Notes

  • Only completed/paid payments are exported - pending payments are excluded
  • Payments are filtered by payment date, not invoice date
  • Multiple payments for the same invoice will appear as separate rows
  • Partial payments are included with their actual payment amounts
  • The export file is generated on-demand and not stored on the server
  • Each export creates a fresh file based on current data
  • Date ranges are inclusive (includes both start and end dates)
  • Currency symbols match Great Plains requirements (US$ and JM$)
  • Payment dates are formatted as DD/MM/YYYY for Great Plains compatibility

Using the Exported File

After downloading the CSV file:

  1. Open the file in Excel or a text editor to review the data
  2. Verify that all expected payments are included
  3. Check that amounts, dates, and customer information are correct
  4. Verify CheckCardNumber formatting is appropriate
  5. Import the file into Great Plains using the cash receipt import process
  6. Reconcile the imported data with your accounting records
Payment Export